Napkin Ring Suggestions & Finishing Alternatives, Part 2

Here are my suggestions for making and finishing the last two napkin rings if you don’t want to use plastic inserts.

For the Tile Stitch Napkin Ring & Ripple Stitch Napkin Ring

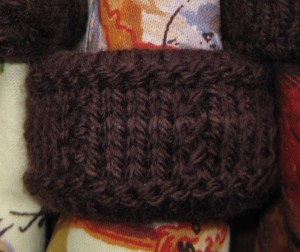
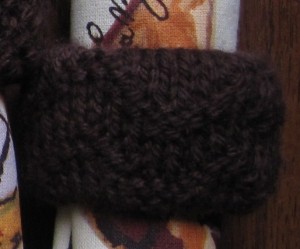
Similar to the other napkin ring patterns, the interiors of the Tile Stitch and Ripple Stitch napkin rings are formed by the beginning five rounds and ending five rounds in Stockinette stitch.

However, these two patterns contain a few extra rounds of Stockinette stitch at the beginning and end in order to center and show-off the tile and ripple patterns, so I would not recommend deleting all beginning and ending rounds of Stockinette stitch if you choose not to use plastic inserts.  Instead, just subtract five rounds from both the beginning and end, and keep one or two rounds in Stockinette stitch as per the modified pattern.

So, for the Tile Stitch Napkin Ring, modifying the pattern for use without inserts would mean knitting all the stitches for two rounds at the beginning and two rounds at the end.  For the Ripple Stitch Napkin Ring, the modified pattern would be to knit all stitches for one round at the beginning and two rounds at the end.

If you do choose to eliminate those beginning and ending five rounds, consider which cast on you’ll use so you get a nice edge and one that isn’t too loose (and curls) or too tight (and puckers).  I chose to use the long-tail cast on because it results in a nice edge with good balance between tautness and give.  For the long-tail method, leave yourself a 22” tail when making your slipknot.

Alternatively you can still knit those beginning and ending rounds in Stockinette stitch and sew the cast-on and bound-off edges together as the pattern instructs, just without using the insert.  This would result in a double-thick napkin ring with a nicely finished interior.

Posted in Knitting | Tagged , , , , , , , , , | Comments Off on Napkin Ring Suggestions & Finishing Alternatives, Part 2

It’s “very thorough.”

My Aunt ((The same Aunt for whom I designed the napkin rings.)) and I keep in touch via email. ((We now live across the country from one another, in different time zones, and email is the most convenient for us.))  I emailed her about my blog when I was going to start it.  I wanted to make sure she was okay with me mentioning her, even though it would be essentially anonymous.  She generously and happily gave her blessing ((Thanks again!)) and has been reading my blog since the beginning.

A few emails ago she said she’d been enjoying my blog and she commented that it was “very thorough.”  And that made me laugh, for a few different reasons, and I emailed her back that I just may have to do a post about it, and here it is.

So I found the comment funny for these reasons:

As soon as I read it, what flashed through my head was what someone would say about an obsessed person’s writings, ((I freely admit I am a bit obsessed with knitting, but hopefully not to the point of being freaky, at least not yet. My husband’s my tether; he’ll keep me from falling into the abyss.)) as in, “Wow, it’s…..uh…..very thorough.”  While on the inside they were thinking, “You’re a freak.”  Like “very thorough” is the only nice thing they could find to say about something so weird.  I know this is not what my Aunt meant, and that just made it funnier to me.

I also found it funny because while others may not believe being called thorough is a positive thing, I find it to be a compliment.  But that’s because I appreciate thoroughness.  I’m a very detail-oriented person and thoroughness is a natural extension of that.  So being thorough is just part of my personality, and I like that.

Lastly, the comment was funny because in my blog I am purposely being thorough and very descriptive.  I am a relatively new knitter myself ((I started knitting about four and a half years ago when I was pregnant with my first child. However I’ve really only been knitting for about three years because I didn’t knit for a long time after my daughter was born. For all the parents out there, the reason for me not knitting during that time period will be obvious.)) and I’m trying to give all the details that I would have appreciated and found helpful as a brand-new knitter.  I want my blog and patterns to be accessible to every knitter, no matter what their current skill-level.

So, along with my Aunt, I hope you, too, find my blog “very thorough.” 🙂

Posted in Knitting | Comments Off on It’s “very thorough.”

Knitted Napkin Rings–A Sampler of Sorts, Part 3

This is my last installment on the knitted napkin rings I designed as part of a sampler set of six napkin rings.

I wanted a balanced and cohesive set, so I tried to pick patterns that would complement each other and I wanted a mix of vertically- and horizontally-oriented patterns.  Both tile stitch and ripple stitch combine vertical and horizontal elements within their patterns, making them ideal additions to the sampler set.

Tile Stitch Napkin Ring

With tile stitch, the “tiles” are made by offsetting blocks of Stockinette stitch with vertical columns of purl stitches.  These tiles appear side-by-side in a band around the napkin ring’s center and rounds of purl stitches create the tiles’ tops and bottoms.  So the tiles individually appear as a vertical, and in succession form a horizontal element.  The purled rounds at the top and bottom further reinforce the pattern’s horizontal nature. 

Ripple Stitch Napkin Ring

Ripple stitch creates undulating lines (just like a ripple in water) that move from side to side and top to bottom around the napkin ring.  So your eye moves vertically, up and down, with the rise and fall of the ripples, and horizontally as it follows the continuous bands of ripples around the napkin ring.

Download the last two sampler napkin ring patterns here:

Posted in Knitting | Tagged , , , , , , , , , , | 1 Comment